Would you like to learn how to create jump links in WordPress?
Jump links can make it easier for readers to find what they want on your pages. And they can boost your SEO.
In this step-by-step tutorial, you’ll learn how to add jump links to your WordPress website easily.
What you’ll need: The All in One SEO (AIOSEO) plugin
In This Article
What are Jump Links?
Jump links, also called anchor links, are hyperlinks you click on to jump to another section of the same web page. Examples of jump links are a table of contents, a footnote, or a link to a “Related Reading” section.
Are Jump Links Good for SEO?
Jump links can be good for SEO because they may be displayed in search results. Your article snippet may wind up with 3-4 links instead of just 1 title link.

As you can see in the example above, jump links give searchers a way to click on the exact section of the article they are interested in, like “Fix medium holes.”
And because these links provide additional information about the article, they lead to more click-throughs, a lower bounce rate, and higher conversions.
Are you ready to learn how to get these kinds of results? Let’s get started.
How to Create Jump Links WordPress Automatically: Easy Table of Contents
The easiest way to create jump links for SEO is to use a plugin to generate a table of contents from a finished article automatically.
Step 1: Install the All in One SEO (AIOSEO) Plugin
First, we recommend that you download the AIOSEO plugin. One of the best features of this plugin is the AIOSEO – Table of Contents block.
This block will instantly add a table of contents to a completed post.

After downloading the plugin from AIOSEO, open your WordPress editor and go to Plugins » Add New. Then upload the zip file of the plugin.
Have questions? Follow the instructions here to install and activate it.
Now you’re ready to add a table of contents to a post.
Step 2: Add a Table of Contents to an Article
In the WordPress editor, open a post to which you want to add a table of contents.
In the body of the post, place your cursor where you want the table of contents.
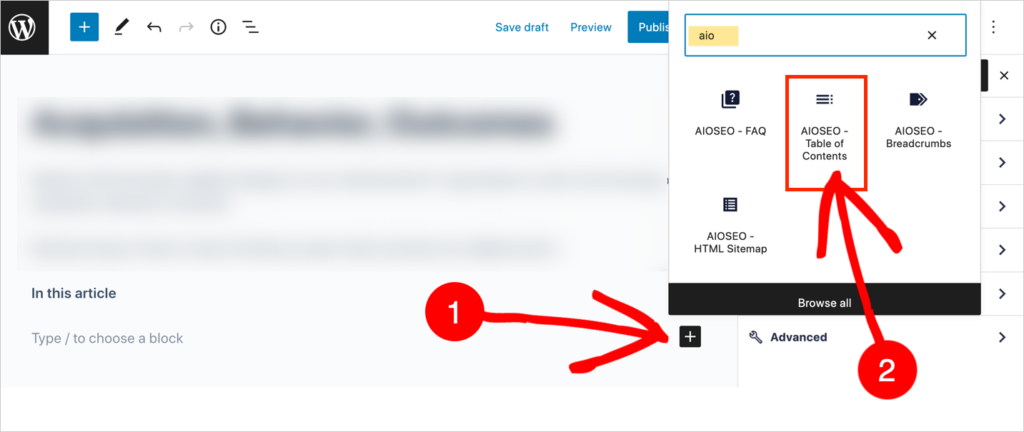
- Next, click the black + (“add block“) icon.
- Type “AIOSEO” in the popup window’s search field and click on AIOSEO – Table of Contents.

- Now you’ll see the table of contents (TOC) inserted on your page. This is what the TOC looks like in editing mode.

Step 3: (Optional): Edit Your Table of Contents
There are a few ways to edit your table of contents.
You can:
- Edit the list items
- Remove list items
- Re-order list items
- Edit the style.
How to Edit List Items
To edit a list item, simply place your cursor in the list item field and edit the text. The associated headings in your article will remain the same.
Also, shortening these where possible is a good idea. It makes it easier for readers to scan what’s in your table of contents quickly. If your table of content headings are long, they may be truncated in search results. Here’s an example below.

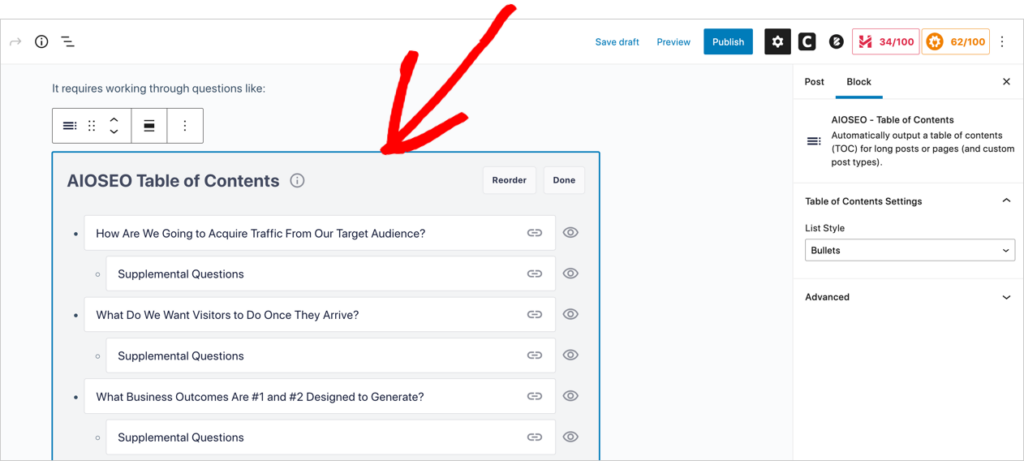
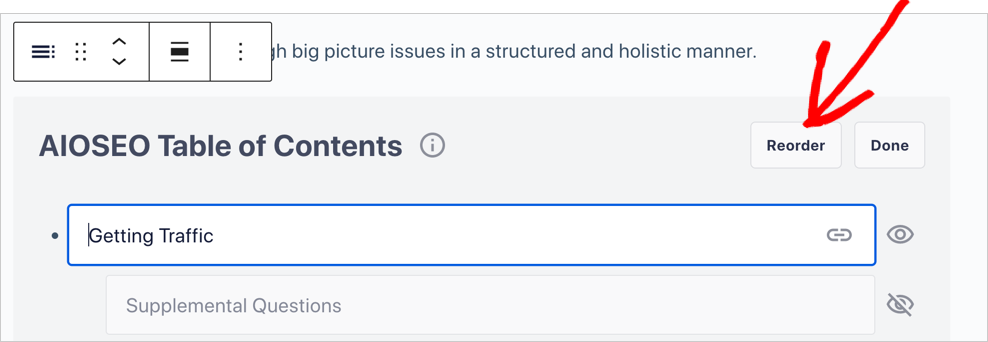
In the next example, we’ve edited some of our headings to be shorter:

But we have some repeated items (“Supplemental Questions”) which we don’t want to show up in search. Let’s find out how we can hide these from viewers.
How to Remove List Items
To remove individual items from the table of contents, click on the eye icon to the right.

Now that list item will be invisible to viewers. (You can make it visible again by clicking on the eye again.)
How to Reorder List Items
If you want to change the order of the list items, you can easily do this. It won’t affect the order of the associated headings in your article.
- Click the Reorder button at upper right.

- Grab the 6-dot icon next to the item you want to move and drag your heading to where you want it.

- Let go of the icon once your heading is where you want it.
How to Edit the Style
To view your style options:
- Click on the table of contents area
- Then click the gear icon at the top of the page.
Now in your right-hand “Block” menu column you’ll see AIOSEO – Table of Contents settings.

- Under List Style you can choose to display your table of contents as a numbered list vs. the default bullet list.
- Or you can add custom CSS code to alter the appearance. (This is for advanced users.)

Search engines aren’t obligated to display table of contents items in their results. But adding them can boost the chances that this happens and improve user experience on your site.
How to Create Jump Links in Gutenberg Without a Plugin
In this section you’ll learn how to add jump links using just the Gutenberg block editor. Even if you have the AIOSEO plugin, you can use this information for adding individual jump links in the text of your posts.
Step 1: Create an Anchor
- On your post, navigate to the block where you want the jump link to lead people to. Place your cursor in that block.
- In the right-hand Block menu, scroll down to Advanced. You’ll see a field called HTML anchor. If your cursor is on a heading block, (as in the example below), then this HTML anchor field will be instantly filled in for you.

- If your anchor isn’t a heading block, copy and paste a few words from the block into the HTML anchor field (hyphens will be automatically inserted).
- If you prefer to create your anchor text by typing it directly into the HTML anchor field, be sure to put hyphens between the words. (You can type in anything you like.)
Tip: You can’t use the same exact anchor text twice on a page.
The HTML anchor is also called an anchor id or anchor tag.
Step 2: Link to Your Anchor
Now navigate to the place on your page that you want to link from.
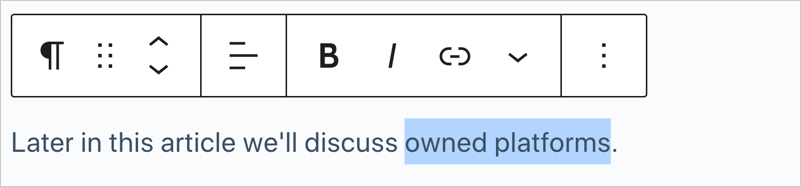
- Highlight the word or phrase you want to add the jump link to.

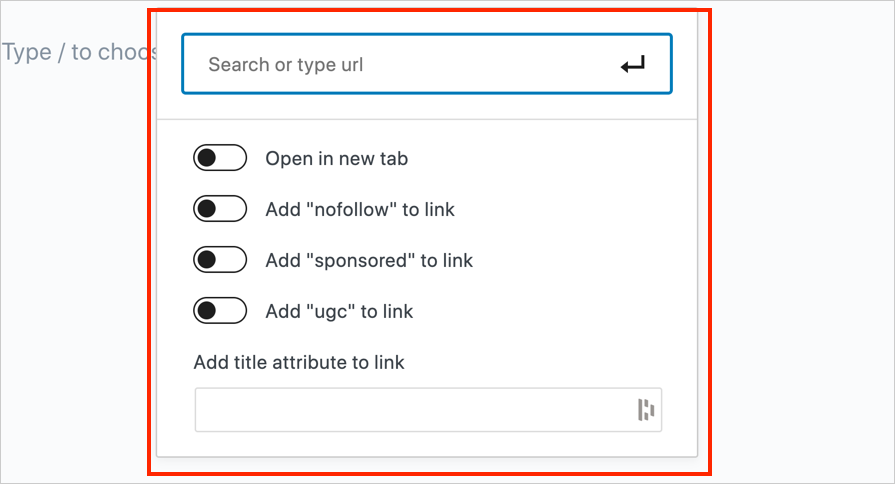
- In the toolbar that appears directly above, click the link icon. (That will open a small pop-up window.)

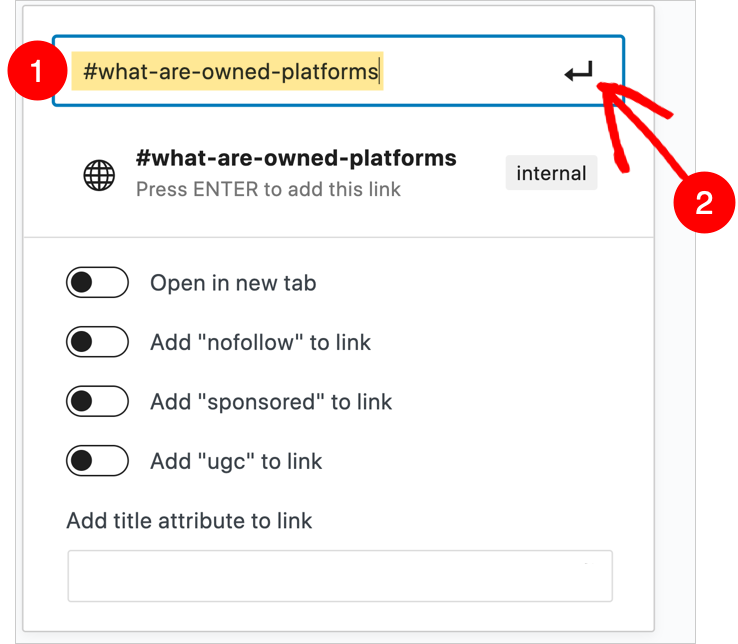
- In the top-most field of that pop-up, paste your HTML anchor text preceded by a hashtag (#). Then click the square arrow at the upper right to save your jump link.

- Save your post draft.
Now, you can preview your post and try out your jump link.
How to Create Jump Links in Classic Editor Without a Plugin
To create anchor links using the WordPress Classic Editor, follow these steps.
Step 1: Create an Anchor
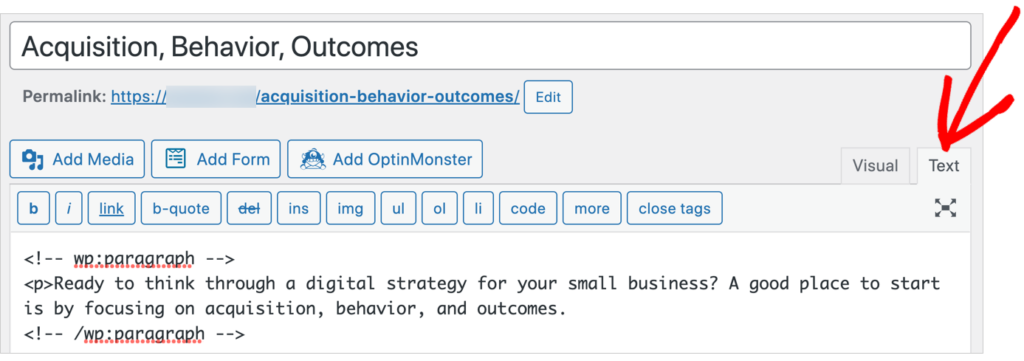
- In the upper right-hand corner of your post, switch from the Visual tab (also called the “Visual editor”) to the Text tab (also referred to as the “HTML editor”).

- Navigate to a header (also called sub-heading) that you want to link to.
- Inside the heading tag type id=”your-anchor-name” (choose an anchor name). In this example, we’ll add an anchor to an <h2> tag in our article, surrounding the heading “Next Action Steps.”

About id Attributes
Note that the “id” attribute must be added within the HTML tag (also called an HTML element).
You’re not restricted to adding id attributes to heading tags though. Here are some examples of other HTML tags you could add id attributes to in order to jump to specific areas of a page:
- <table>
- <img>
- <video>
- <audio>
- <map>
Step 2: Add the Jump Link
- Next, highlight the text that you want to add the jump link to. (In the example below, we highlighted “plan your digital actions.”)
- Now click the “Link” button at the upper left.

- An Insert/edit link pop-up window will appear. In the URL field, type a hashtag (#) followed by the name of your anchor.


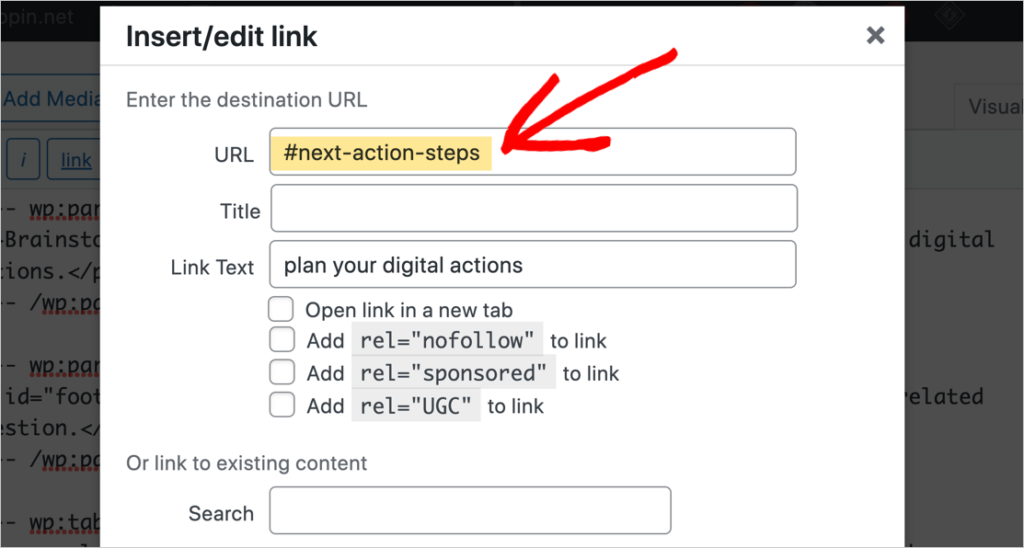
In the HTML code, your anchor link will look like this:
<a href="#next-action-steps">plan your digital actions</a>- Save your draft and preview/test the page.
As you can see, it’s easier to add jump links in the Gutenberg editor than in the Classic editor.
Now, let’s move on and consider another type of jump link: footnotes.
How to Create Footnotes in WordPress
Footnotes are jump links too, but with a twist: they’re numbered sequentially and provide a way to return to the reference in the body of the article. And they’re represented by superscript numbers in the text.
Because footnotes need special styling, the easiest way to create them is to use a WordPress plugin.
Do a search for “WordPress footnotes plugins” to find one you like.
Before your search, decide whether you want to create different visual styles for your footnotes. If so, look for a plugin that includes design options.
Ideas for Using Anchor Links
A table of contents makes it easier for users to navigate a long page. This is particularly true for smartphone users.
Here are a few additional ideas for using page jump links.
- Case study page: Link from an introductory summary to the study itself.
- Promotional page: Link to a “buy now” or “book appointment” section.
- Event page: Link to registration section.
Interested in Other Table of Contents Plugins?
We recommended the All in One SEO (AIOSEO) plugin in this article as an easy way to add a table of contents. AIOSEO has high ratings on WordPress.org due to its ease of use and versatility.
If you’re looking for plugins that do one thing only — add a table of contents — check out these options.
- Heroic Table of Contents
- Joli Table of Contents
- LuckyWP Table of Contents
- SimpleTOC
What’s Next?
When jump links appear in search results, they can boost revenue and conversions. We’ve also seen how they improve user experience by making it easy for site visitors to hop to a specific section of a page.
We hope this post helped you learn an easy way to add jump links to your WordPress site. You may also want to check out how FAQs can supercharge your traffic and add some breadcrumbs for SEO while you’re at it.